Unlocking Nature’s Bounty: Crafting Free Liquid Fertilizer Using an Ancient Method

For centuries, farmers and gardeners have relied on nature’s own resources to nourish their plants. One such time-tested technique is making your own liquid fertilizer—an easy, free, and natural way to boost plant health using simple ingredients. In this article, we explain a traditional method that uses everyday organic materials to create a nutrient-rich “tea” that can help your garden flourish.
What Is Liquid Fertilizer?
Liquid fertilizer is a watery extract that carries essential nutrients—such as nitrogen, phosphorus, and potassium—as well as trace minerals needed for strong plant growth. Unlike granular fertilizers, liquid versions are quickly absorbed by plants when applied to the soil or foliage. This ancient method relies on steeping organic matter in water, which releases valuable nutrients naturally.

The Ancient Method: A Simple Overview
The basic idea is to take plant materials that are rich in nutrients, soak them in water, and let nature do its work. This method has been used by generations of gardeners and farmers who understood that nature recycles its own waste to feed new growth. By following these simple steps, you can create your own free liquid fertilizer at home.
Materials You Will Need
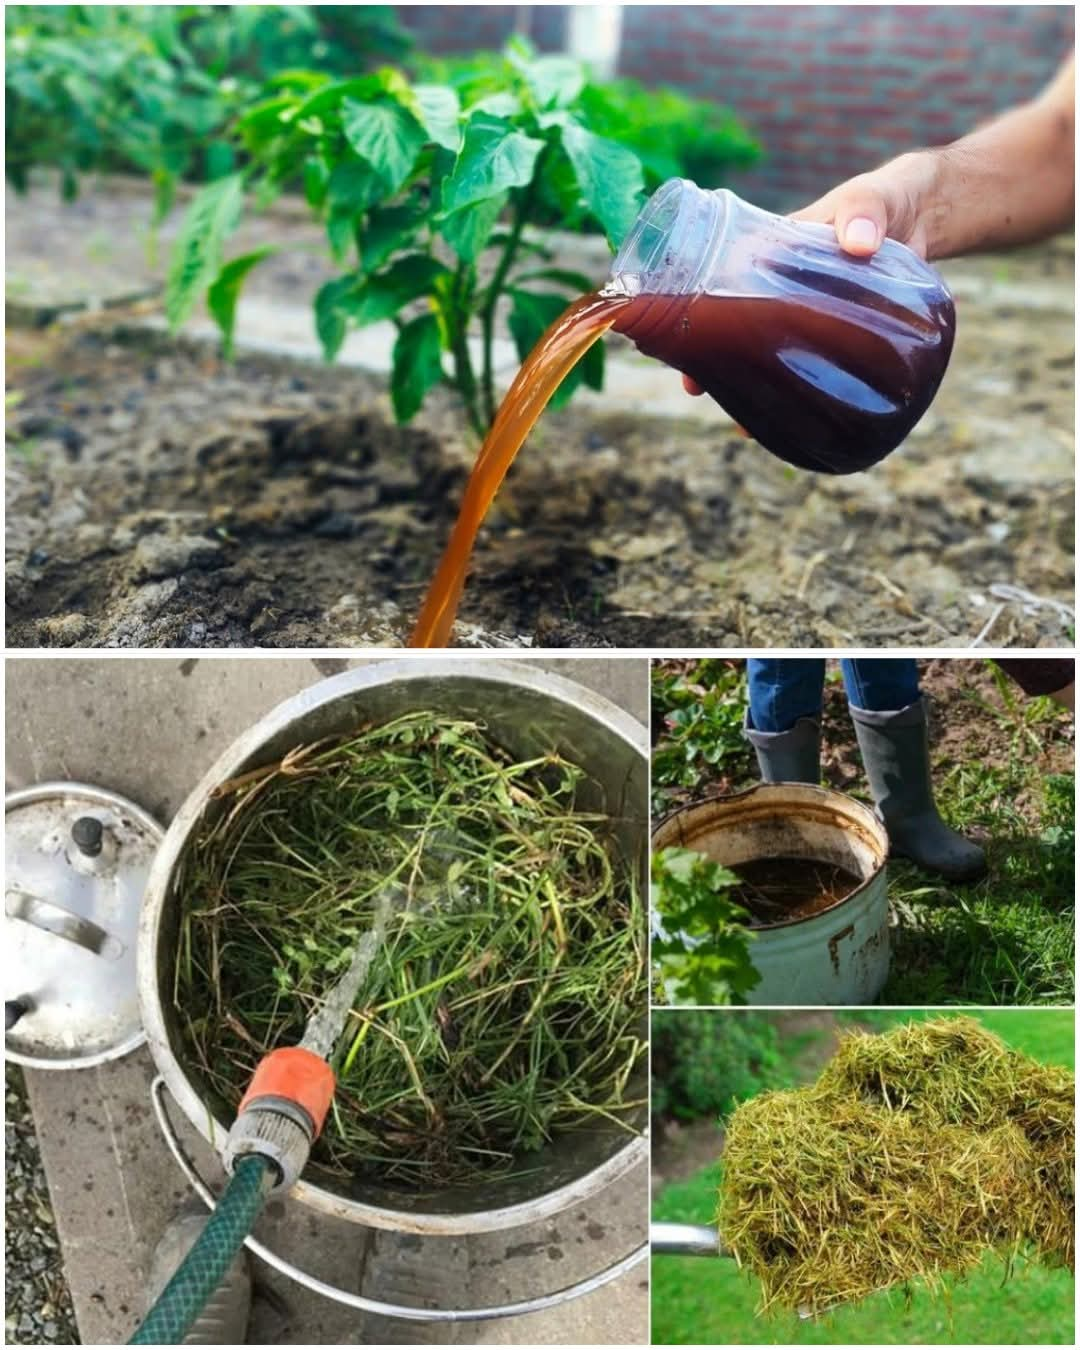
- Organic Material: Look for nutrient-dense plants such as nettles, comfrey, or even kitchen scraps like fruit peels and vegetable trimmings. Many gardeners swear by wild nettles; they are full of nitrogen and other minerals that plants need.
- A Container or Bucket: Use a clean container with a lid. A 5- to 10-gallon bucket works well.
- Water: Use non-chlorinated water if possible (let tap water sit out for 24 hours to allow chlorine to evaporate, or use rainwater).
- Straining Material: A piece of cheesecloth or an old t-shirt to strain the liquid later.
Step-by-Step Instructions
- Collect Your Materials:
Gather about 2–3 pounds of fresh, nutrient-rich organic matter. If you’re using wild nettles or comfrey, wear gloves to protect your hands from any stinging hairs. - Prepare the Organic Matter:
Roughly chop or tear the plant material into smaller pieces. This increases the surface area and helps release more nutrients into the water. - Fill the Container with Water:
Fill your bucket with water, leaving a little room at the top so the organic matter can be stirred without spilling. - Add the Organic Matter:
Place the chopped plant material into the bucket. Stir it well so that all the pieces are in contact with the water. - Cover and Let It Steep:
Cover the bucket with a lid or cloth. Let the mixture sit at room temperature for about 3–7 days. Stir the mixture every day to help release the nutrients. The liquid will start to darken as the nutrients dissolve into the water. - Strain the Liquid:
After the steeping period, use your cheesecloth or t-shirt to strain the liquid into another container. Squeeze out as much of the liquid as possible from the plant material. - Dilute Before Use:
The concentrated “tea” you have made is very strong. Dilute it with water before applying it to your plants. A common dilution ratio is 1 part fertilizer to 10 parts water. Always test on a small patch of plants first to ensure they respond well. - Apply the Fertilizer:
Pour the diluted liquid fertilizer around the base of your plants or use a watering can to apply it evenly over the soil. This will give your plants a quick boost of nutrients.
Benefits of Using Homemade Liquid Fertilizer
- Cost-Effective: You use free or low-cost materials that are often readily available in your garden or kitchen.
- Eco-Friendly: This method recycles natural resources without the need for chemical fertilizers that can harm the environment.
- Nutrient-Rich: The liquid fertilizer provides a balanced mix of nutrients that are easily absorbed by plants, leading to stronger growth and improved yield.
- Simple and Traditional: Following an ancient method connects you with the natural wisdom of past generations and helps maintain sustainable gardening practices.
Tips for Success
- Rotate Ingredients: Different organic materials release different nutrients. Vary your ingredients to give your plants a broad range of vitamins and minerals.
- Monitor Plant Response: Start with a small amount of diluted fertilizer and gradually increase if your plants seem to benefit.
- Use Regularly: For best results, apply your homemade fertilizer every few weeks during the growing season.
Final Thoughts
Crafting your own liquid fertilizer is a rewarding way to support your garden using nature’s own bounty. This ancient method is simple, cost-effective, and environmentally friendly. By using readily available plant materials and water, you can create a nutrient-rich liquid that feeds your plants and promotes healthy growth.

Whether you’re a seasoned gardener or just starting out, this DIY approach will help you unlock nature’s bounty and enjoy the satisfaction of nurturing your garden with your own homemade fertilizer. Enjoy your journey toward a greener, healthier garden!
